Hardware Registers
The registers for the XiBIF platform are generated using the open-source tool corsair. We have forked the original and expanded and fixed some features. Currently, there are a lot of ongoing changes in the original corsair project. In the future, we plan to get back to the upstream branch.
You can find the original corsair documentation here.
Benefits of Generating Registers
Data Consistency
Generating hardware registers from a structured definition ensures data consistency across an entire system. When registers are manually implemented, discrepancies can arise between the specification and the actual implementation, leading to hard-to-trace bugs. With automated generation, all register definitions come from a single source of truth, ensuring that every instance—whether in software, firmware, or documentation—remains synchronized. This consistency is crucial in complex systems where even small mismatches can cause significant issues.
Maintainability
Manually managing hardware registers becomes increasingly difficult (and tedious) as designs grow in complexity. With generated registers, updates and modifications are centralized in a structured definition file, allowing changes to propagate automatically across the implementation. This reduces the risk of missing updates in different parts of the system and makes it easier to accommodate design changes without requiring extensive manual edits. As a result, the development process becomes more efficient, and long-term maintenance is simplified.
Testing and Verification
Generated register implementations are inherently more reliable because they follow a predefined structure and can be validated systematically. Since they are created from a structured format, automated tests can be run against them to verify correctness, eliminating human error that might occur in hand-written implementations. Additionally, automated generation enables early detection of inconsistencies, ensuring that all registers behave as expected before integration into hardware or software.
Documentation
Arguably, one of the most important yet also most overlooked points when creating registers is documentation. We get it! No one likes to write it, and most of the time, no one likes to read it either. However, when (not if) you find yourself picking up someone else’s poorly documented project, you will see that there is no excuse for poorly documented code.
For this project, you will not have to worry about writing register documentation. Yay! It will be automatically generated for you and is located in the doc/ folder. A Markdown file contains register descriptions and even images that are automatically built from the register description file.
Note
The better you name your registers and the more care you take to write the descriptions, the more complete the automatic documentation will be.
The following is an excerpt from an automatically generated documentation.
ADC Configuration Register
Address offset: 0x04
Reset value: 0x00000000

Name |
Bits |
Mode |
Reset |
Description |
|---|---|---|---|---|
data |
31:16 |
ro |
0x0000 |
ADC DATA |
x |
15:14 |
x |
0x0 |
Reserved |
osr |
13:12 |
rw |
0x0 |
Oversampling Ratio |
x |
11:9 |
x |
0x0 |
Reserved |
ose |
8 |
rw |
0x0 |
Oversampling Enable |
x |
7:1 |
x |
0x0 |
Reserved |
en |
0 |
rw |
0x0 |
Enable ADC |
Enumerated values for ADC_CFG.osr
Name |
Value |
Description |
|---|---|---|
OSR2 |
0x0 |
Oversampling Ratio = 2 |
OSR4 |
0x1 |
Oversampling Ratio = 4 |
OSR8 |
0x2 |
Oversampling Ratio = 8 |
OSR16 |
0x3 |
Oversampling Ratio = 16 |
Graphical User-Interface
Note
To generate the GUI, you need to have GTK 3.0 installed. This can be done using Anaconda virtual environments.
To help you get up and running as fast as possible, a GUI can be automatically generated to interface with your registers. It will present you with a view of all your registers and let you read, write, and reset them based on the access permissions you have defined.
Below you can see what the generated user interface looks like.
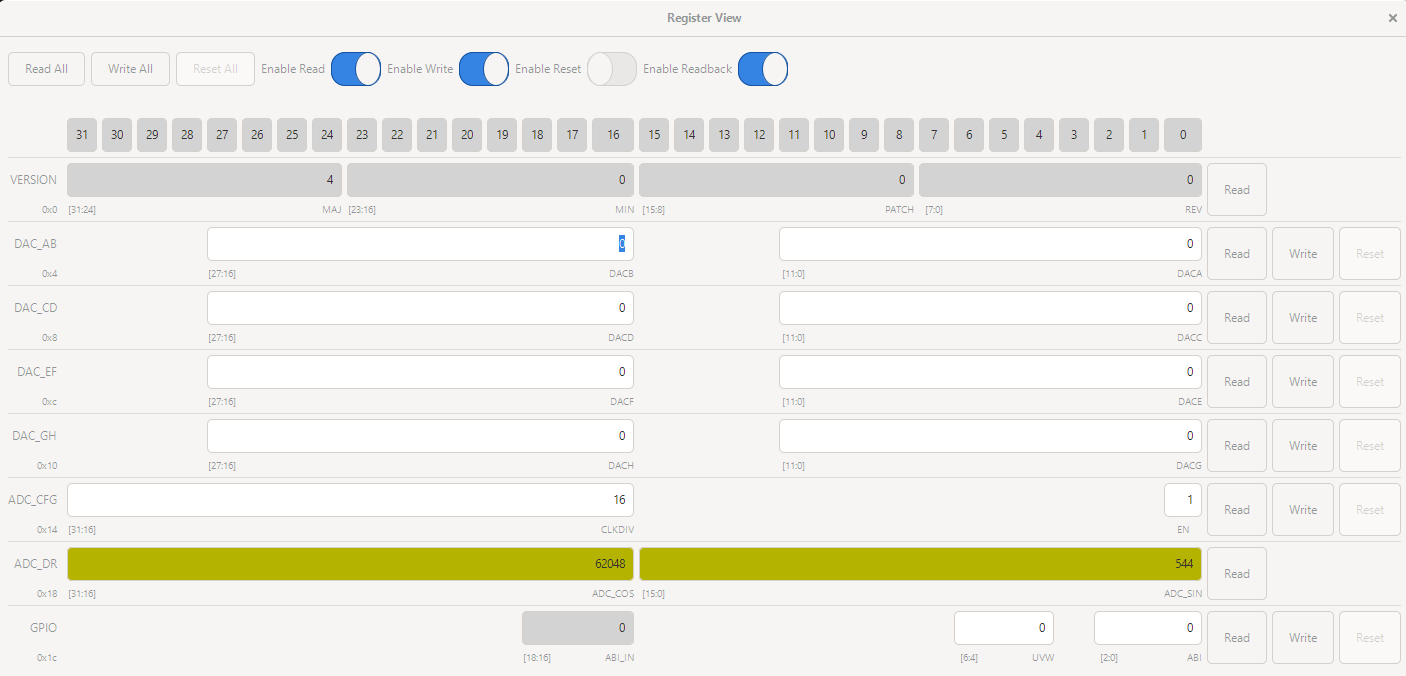
The automatically generated graphical user interface.
The interface is generated using GTK 3.0, a toolkit for creating cross-platform GUI applications. The application is a separate Python class that can easily be instantiated in another GUI application, providing great flexibility.
The GUI provides you with individual reads and writes per register and also allows you to read/write all of them. When a register cannot be written due to the access being ro, the field is grayed out, and no Write button is present.
If a field has changed its value since the last read, it will be marked yellow. When you enter an invalid number into a field (e.g. 12 in a 3-bit register), the entry box will turn red, and you will not be able to write the register.
You can tab between the fields in the standard top-left to bottom-right fashion. If you wish to change the switches’ default settings, see the corsair configuration file in your hw/regs/ directory.
Warning
The GUI file is not generated automatically! You need to manually add the generator statements to the register configuration file